Step 1 – Download WordPress for Android (it’s free!)
Go to the Android Market from your device and search for “wordpress,” the top result should be WordPress by Automattic, Inc. Alternatively, you can use a barcode scanner on your device and scan the QR code to the right; this will take you directly to the app.
Step 2 – Install the App
Just tap Install
Allow the app to have access to the needed systems by tapping OK
You can pull down your shade and see it installing; I like doing that
Step 3 – Open the App and Configure
Scroll down in your apps and find the WordPress icon; tap on the WordPress icon
Pretty
Accept License Agreement by tapping Accept
Now you’re presented with several options. You can Start a new blog at WordPress.com, Add existing WordPress.com blog, or Add existing WordPress.org site. These can be confusing if you’re not super up on how WordPress operates. If you have a HOSTED WordPress blog and you log in from wordpress.com, then you can use the Add existing WordPress.com blog option. If you have your own website hosted somewhere other than WordPress.com you most likely are going to use the Add existing WordPress.org site option. For this tutorial we’re using our self-hosted WordPress, so we’re logging into this as Add existing WordPress.org site
Input your account details: Blog URL, username, password – then tap save And it’s ready for use!
Using the Android WordPress App
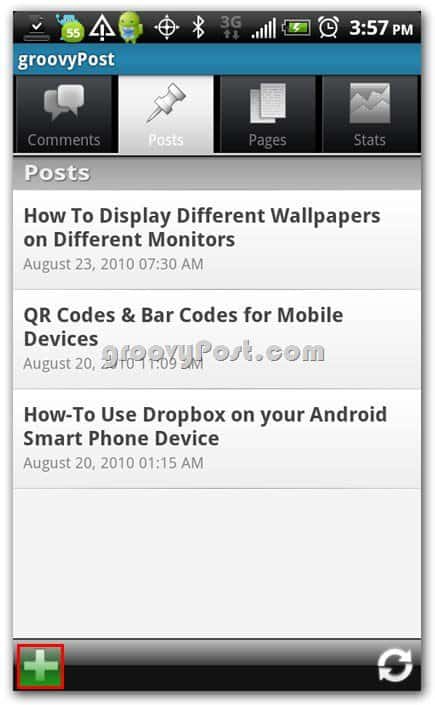
Tap your blog title as seen in the previous screenshot, and you’ll see a screen that looks like this (see below.) From here you can browse your comments, posts, pages, and stats – IF you have permissions! Sometimes you may just be a contributor or an author so that you won’t have access to some of the features in this app, and you’ll get an error message. Tap Posts and we’ll look at a few articles I’ve written
Tap the plus (+)a, and you’ll be shot right into the editor to begin creating a new post It’s quite a robust editor for only being a mobile device app; you have the basic functions that you’d have in your web editor. You don’t, however, have the advanced “kitchen sink,” or the code view, but this app isn’t meant to be your everyday tool for blog posting.
Back out of the post editor using your device’s back button, and now tap your device’s menu button; from there tap Blog Settings
From here you can scroll down, and you’ll find the Location section. Here you can choose if you’d like to have your posts Geotagged – by default, this setting is off.
Now let’s back out to the main screen where it shows us our blogs; you can do this by tapping your device back button twice. Then tap your device menu button and choose Preferences.
You can choose your comment notification settings and create a unique Post Signature so that people will know you posted from your Android device
Managing Multiple WordPress Accounts
This process is super easy to do with the WordPress App. From the main WordPress screen, tap menu on your device then tap Add Account. Follow the same steps as before, and you’ll be groovin’ with multi-blog management from your Android device!
So what do you think – is this app groovy or what? Comment below and let us know what you think! About the Author: Jordan Austin Web designer and developer by day, groovyContributor by night. Feel free to drop a note below for Jordan or chase him down on his personal blog missingdesign.com. I think the only thing that’s missing is the option to actually edit the comments. Maybe we’ll see this option in the next version, which is currently in beta. Any idea what Android device you might look at getting? btw, checkout wiggersrobert.wordpress.com. Ill be adding posts over the coming weekend from my phone. And 9 out of 10 times WordPress crashes. So far, its not realy something for me. Comment Name * Email *
Δ Save my name and email and send me emails as new comments are made to this post.


